Change LCD Huawei Mate 8
Before replacing the screen of your Mate 8, we recommend that you do a complete back-up of your data, as a precaution.

Step 1
Before Replacing the Screen of your Huawei Mate 8, you must turn off your phone for safety Reasons.To do This Press the Power Button For a Few Seconds & Click On Turn Off


Step 2
Insert the SIM card eject tool in the hole.Grasp and remove it.


Step 3
The Mate 8 SIM/Micro SD card tray is now removed.
Step 4
With the Torx T3 screwdriver, remove the two screws on the lower part of the phone.They secure the Mate 8 rear case.

Step 5
Insert the iSesamo in the lower right space of the phone and then, gently pry up to unclip this part.Do the same with the lower left space.


Step 6
The rear case of your Mate 8 is now partially removed.
Step 7
Use the nylon spudger to disconnect the fingerprint sensor cable.


Step 8
Remove the cruciform screw circled in red securing the metal bracket of the battery connectors and dock connector.
Step 9
Grasp the bracket with tweezers and remove it.


Step 10
Keep using the nylon spudger to disconnect the battery connector.

Step 11
With the cruciform screwdriver, remove the screw circled in red securing the metal shield of the back camera connector.
Step 12
Grasp the bracket with tweezers and remove it.


Step 13
Disconnect the back camera with the nylon spurge.

Step 14
Thanks to the nylon spudger, disconnect the dock connector cable and the LCD screen cable.


Step 15
Then, keep using the nylon spudger to disconnect the volume/power buttons cable and the interconnect cable, near the logic board.
Then, keep using the nylon spudger to disconnect the volume/power buttons cable and the interconnect cable, near the logic board.


Step 16
With the cruciform screwdriver, remove the 5 screws circled in red.
Step 17
Grasp the logic board with tweezers and remove it.


Step 18
Get the light/proximity sensor out of its socket with the iSesamo.Remove it.


Step 19
The light/proximity sensor of your Mate 8 is now removed.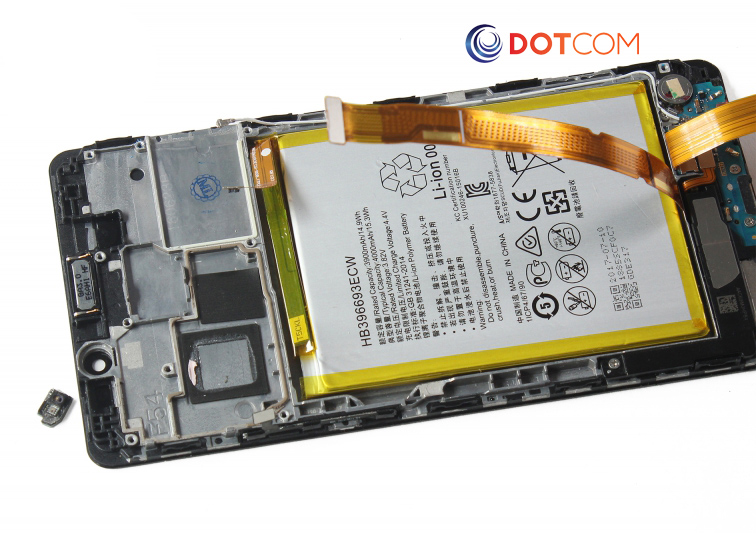
Step 20
Grasp the earpiece speaker with tweezers and remove it.


Step 21
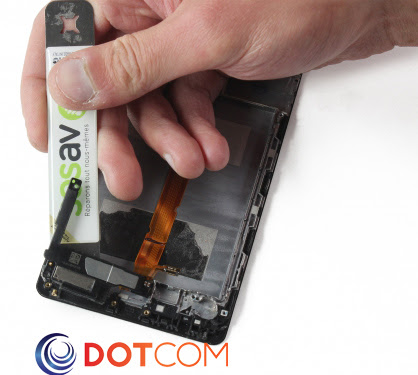
Then, insert the nylon spudger in the space between the frame and the power/volume button cable. Gently peel it off. Remove it.


Step 22
Heat the part facing the battery for 10 to 30 seconds with the hairdryer to soften the glue securing it on the frame.
Step 23
Insert the flat spudger in the space between the battery and the frame and gently pry up to peel it off.Remove it.


Step 24
With the nylon spudger, disconnect the interconnect cable near the dock connector.Grasp it with tweezers and remove it.


Step 25
The interconnect cable of your Mate 8 is now removed.
Step 26
With the cruciform screwdriver, remove the 6 screws circled in red securing the dock connector and the external speaker.
Step 27
Then, grasp the dock connector bracket and remove it with tweezers.


Step 28
After that, disconnect the dock connector cable with the nylon spudger.Grasp the cable and remove it.


Step 29
With the nylon spudger, disconnect the external speaker cable.

Step 30
Thanks to the iSesamo, pry on the dock connector to gently unclip it from the frame and remove it.


Step 31
Gently peel off the vibrator from the frame and remove it thanks to the iSesamo.


Step 32
Keep using the iSesamo to unclip the external speaker and remove it.
Step 33
The screen of your Huawei Mate 8 is now removed.You can replace it with a new one if needed.

Comments
Post a Comment